How can you use Orah’s workflow to streamline internal processes? [Explained with an example]
Kavyapriya Sethu
•
September 20, 2021
.png)
How many hours in a day do you spend doing manual tasks like chasing down the person from whom you need particular information or worse, drowning in paperwork? Now imagine that time is freed up, allowing you to focus on the things that matter to you. That dream isn’t far out of your reach.
Workflows can help streamline and automate repeatable tasks, minimizing room for errors and increasing overall efficiency. You can collaborate in a more productive way, and effectively get your job done. Orah provides a workflow builder that you can leverage to do just this. Still not convinced? Here are some reasons why we believe workflows can be a big life-saver.
- Get a top-level view of your process and understand what can be improved
- Eliminate redundant tasks
- Keep the relevant people in the know and increase accountability
- Improve communication with your collaborators (especially with parents)
- Most importantly, provide a better school experience to students.
Before we look into how you can create a workflow using Orah, here are some common use cases for which many schools have turned to workflows.
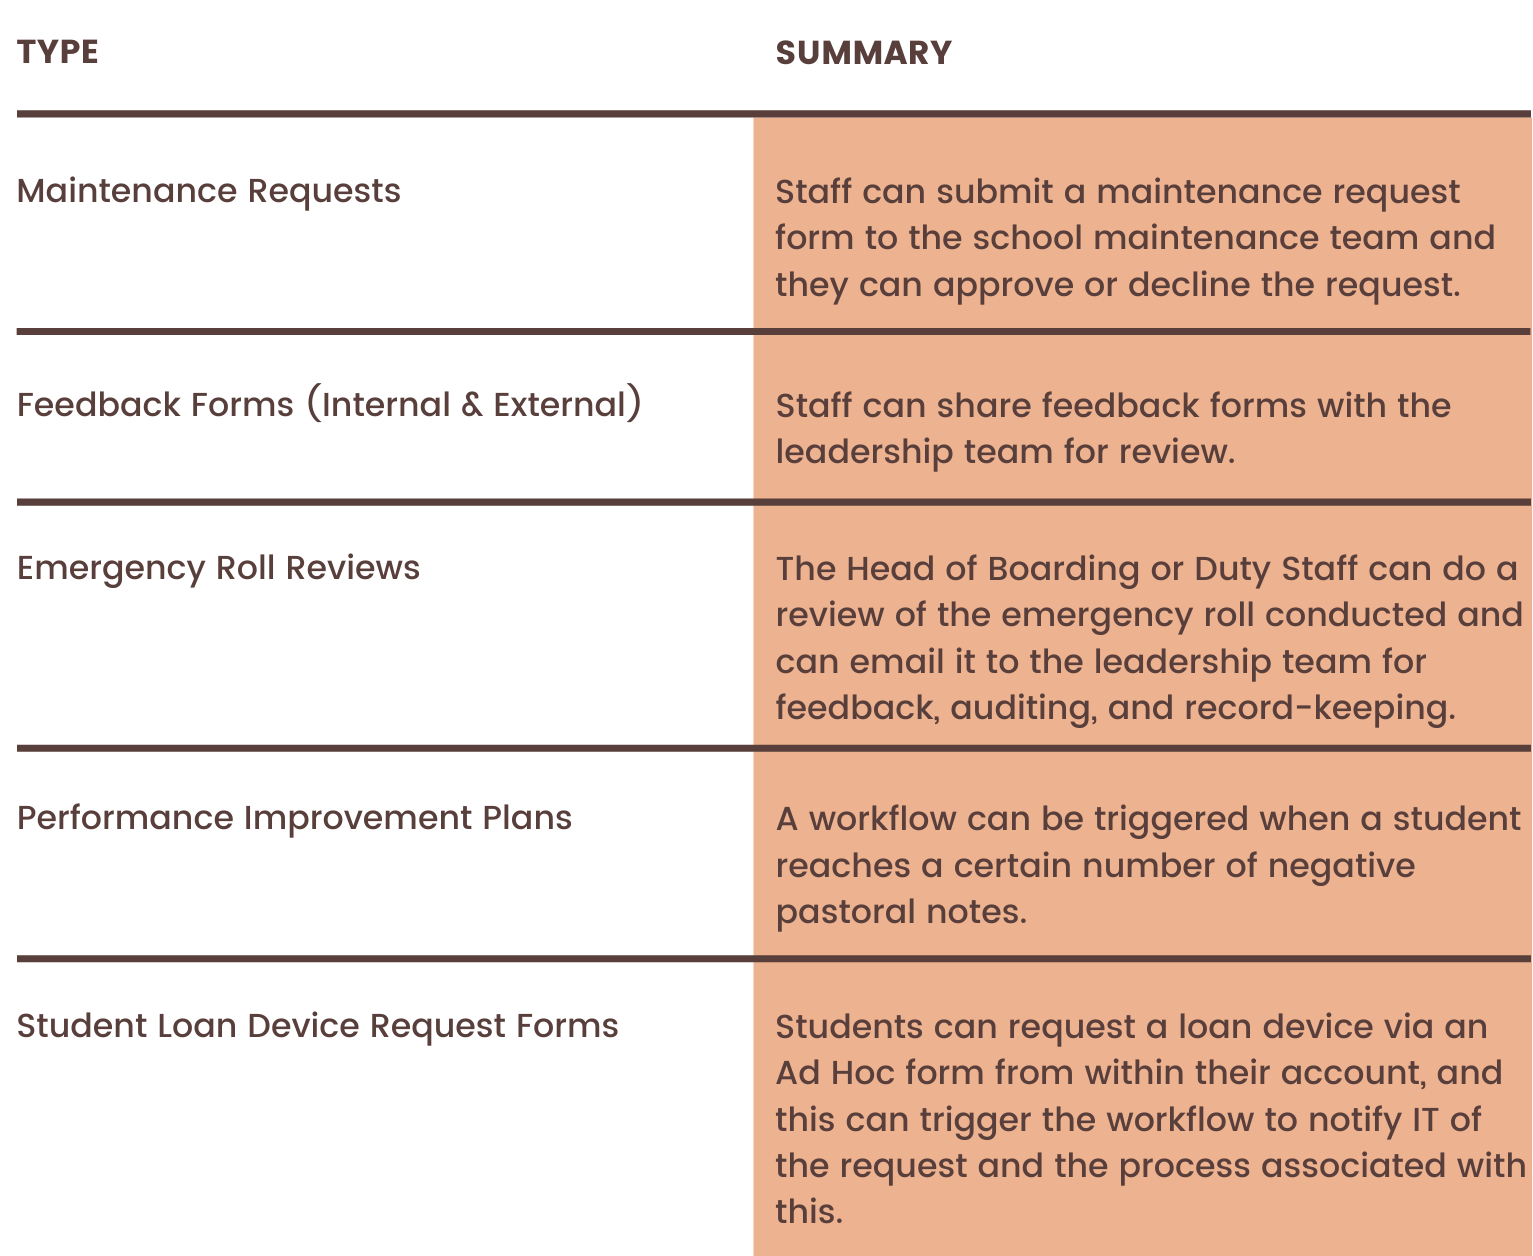

How you can create a new workflow in Orah?
To customize a workflow, admins can navigate to Admin Console -> Unify -> Workflows. You can choose to edit an existing template that your team had previously created or create a new workflow from scratch. To do the latter, click on the +New Workflow button located at the top right.
In the right section, you can create and navigate the steps that are part of the process. In the left section, fill out the necessary fields for each of the steps. As we navigate each of the steps,
Let’s take the example of Performance Improvement Plans. We are going to create a workflow that gets automatically triggered when a student reaches a specific number of negative pastoral notes.
- Give the workflow a name, provide a short description that details what the workflow is all about, and when done, click on Create First Step. For example,
Name: Performance Improvement Plans
Description: To address any performance deficiencies and/or failures to meet specific job goals and/or behavior related concerns.

- Start Workflow: Decide how the workflow is going to be initiated and click Start Next Step. These are options for you to choose from
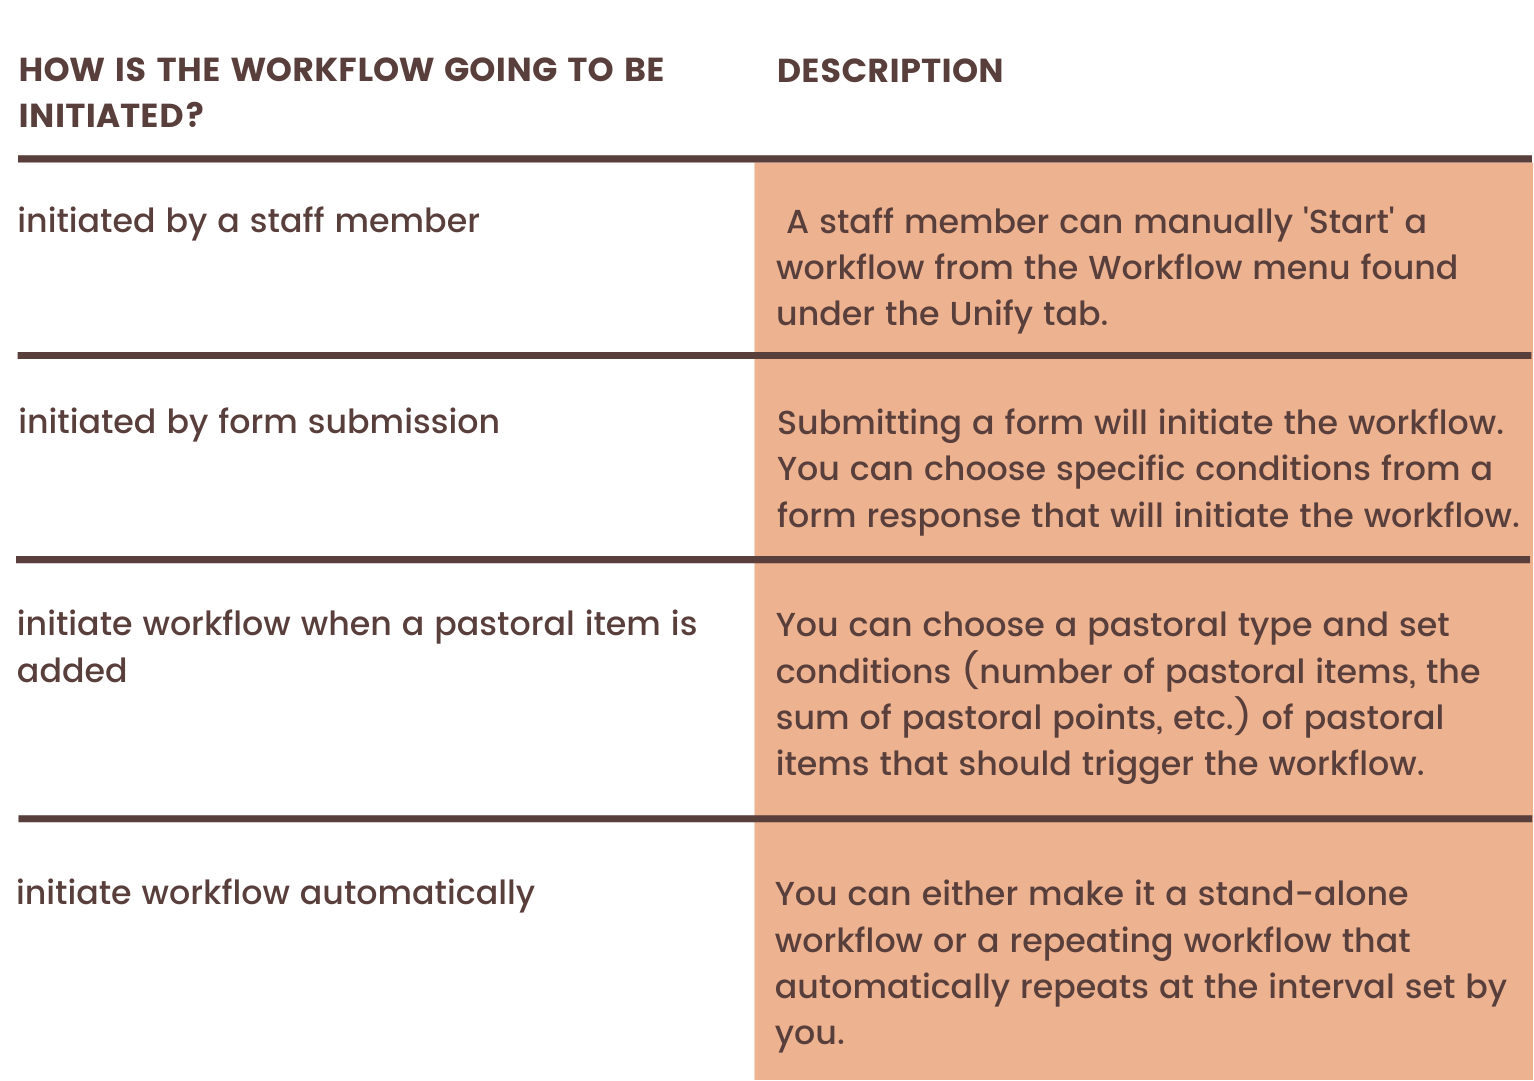
In the example of the performance improvement plan workflow, we are going to initiate a workflow when a pastoral item is added and specify conditions to trigger the workflow when the number pastoral notes exceed a certain limit. We are choosing the pastoral type as Discipline and setting the conditions to be met: Start workflow when 5 pastoral notes are made for individual students in 1 week.
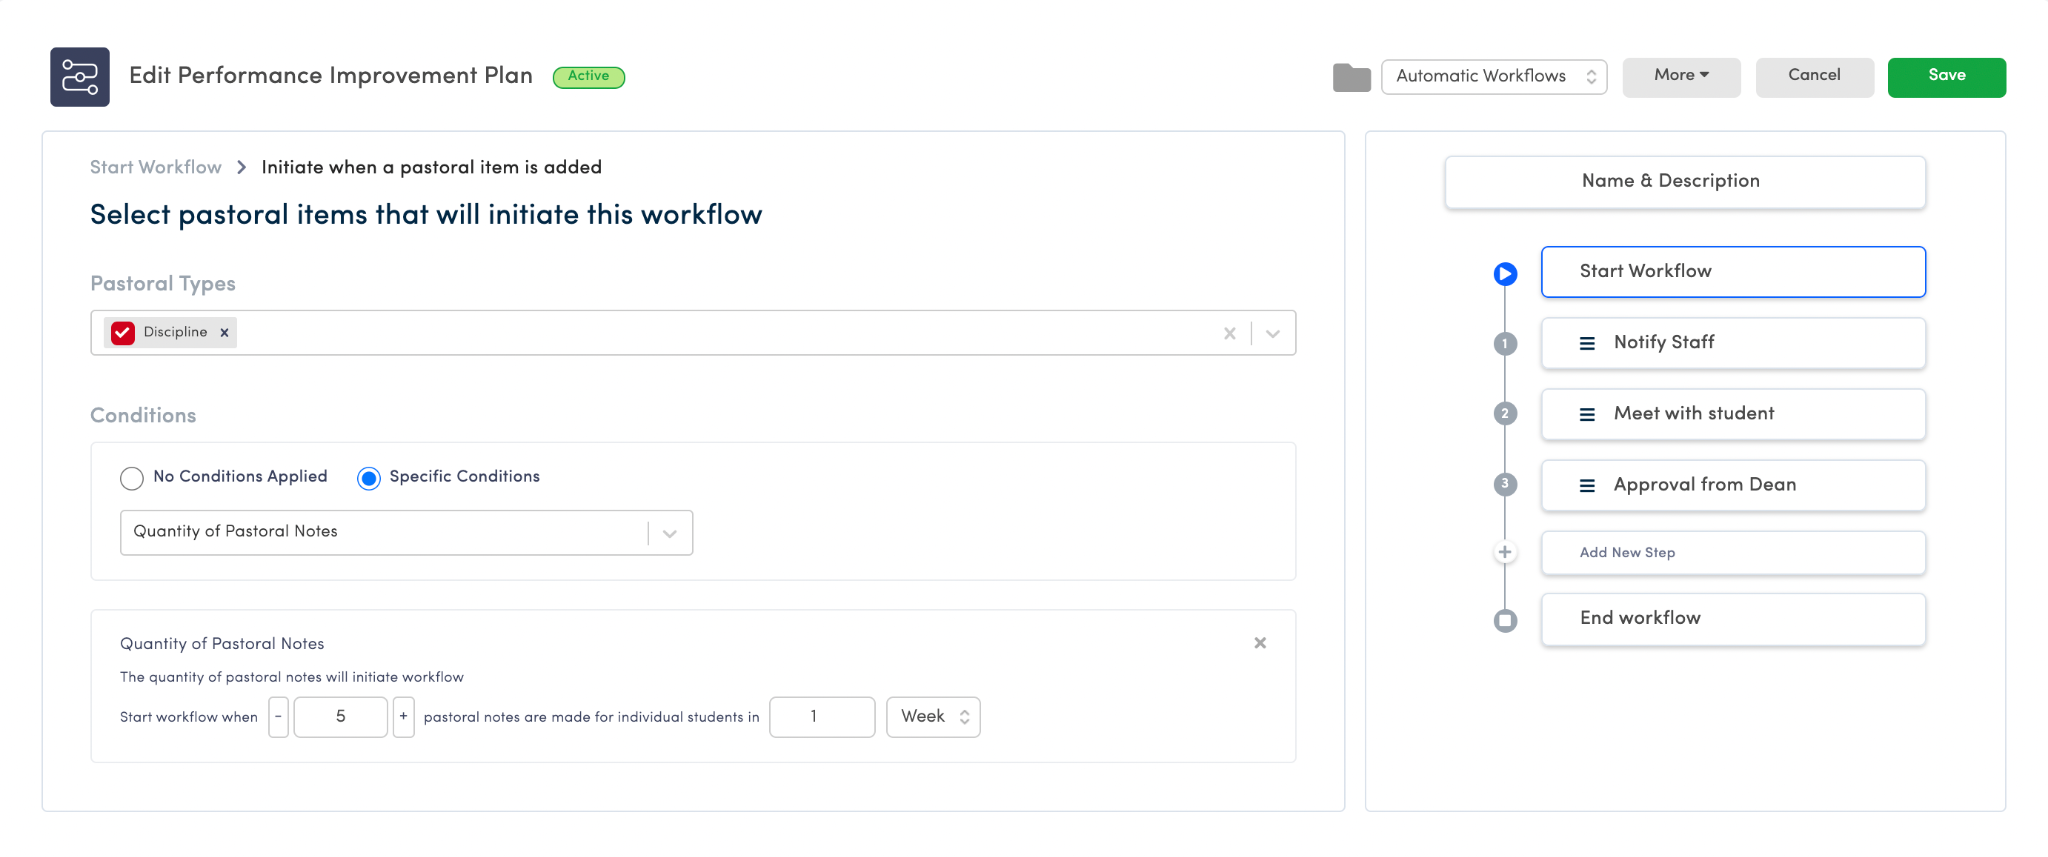
- You can add as many steps as you want and carefully plan out the process that needs to be followed. For each step you add, you can choose between the following and fill in the necessary details for each.
- A staff member has to complete a task
- request approvals from staff members (and save specific records created within the workflow once approval is given)
- send notifications
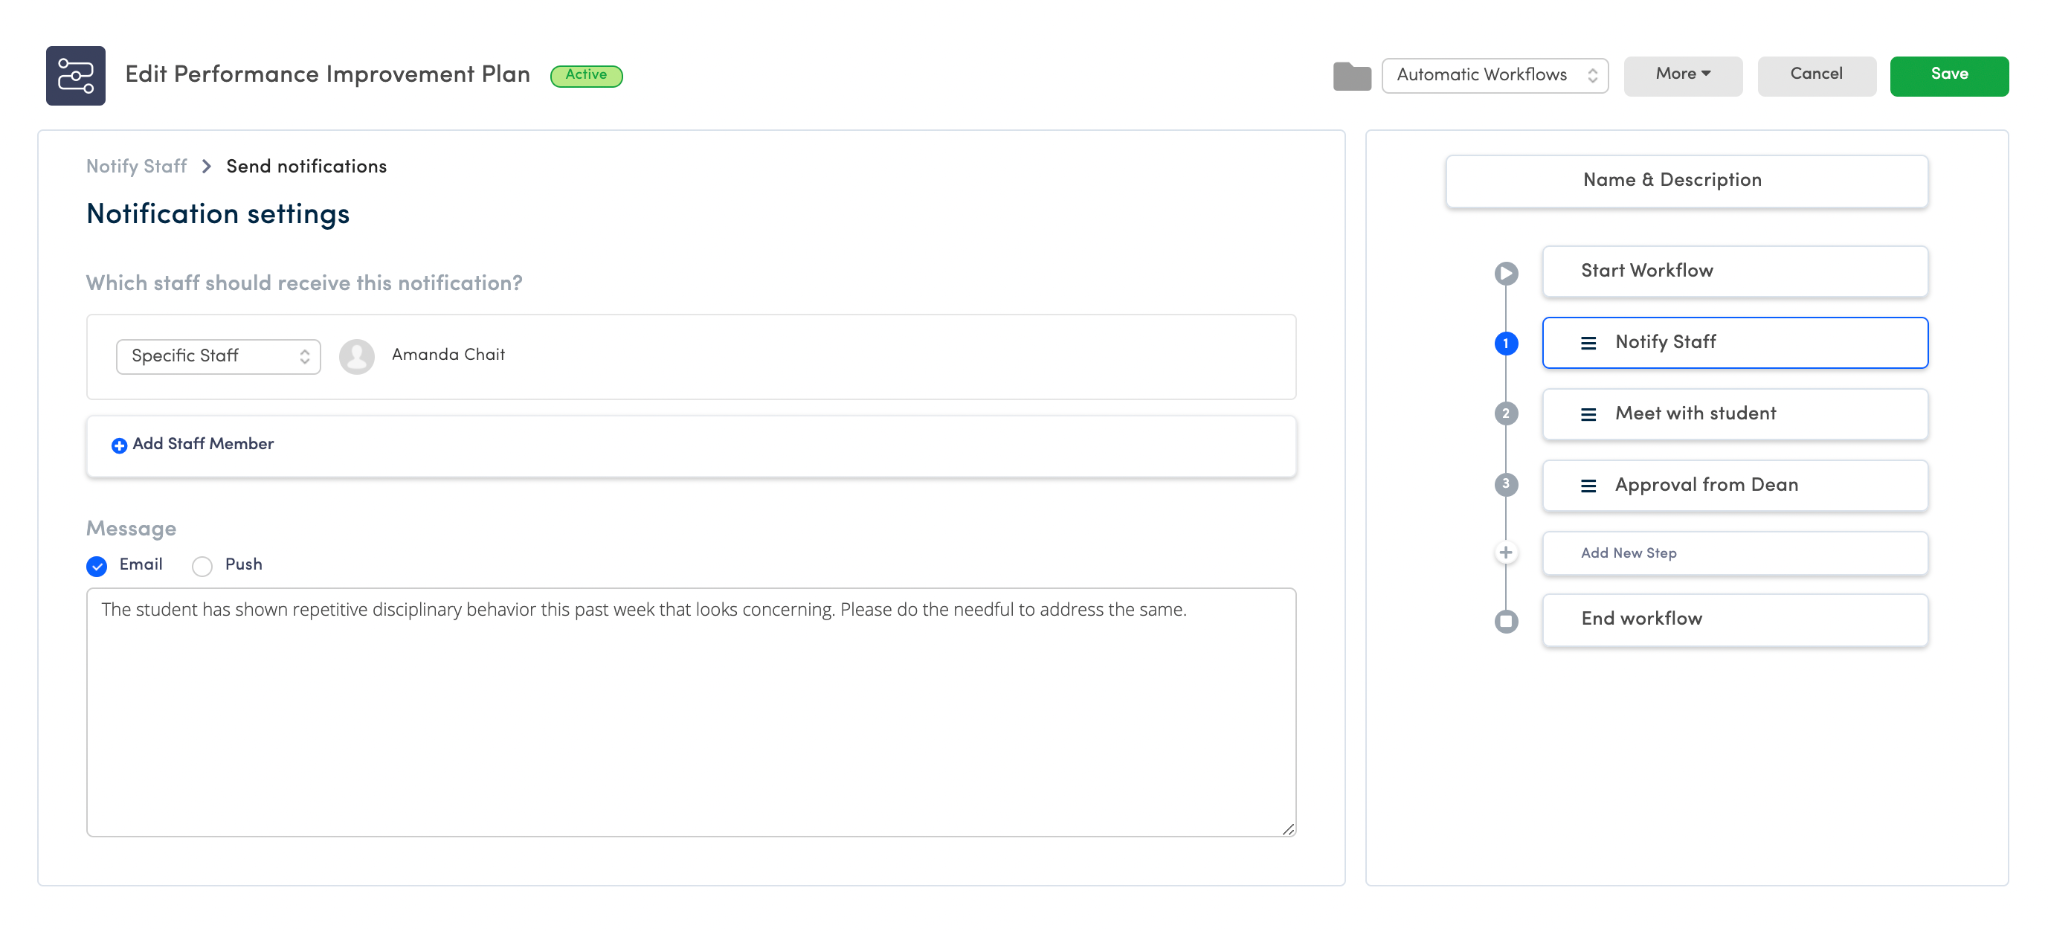
- Step 1: In the example of the performance improvement plan workflow, we are going to add a step to notify the required staff members that a student behavior/performance needs to be addressed. We are going to name the next step as “Notify Staff’ and click the Send notifications tab.
- Next, we are going to fill out the details about which staff should receive this notification, how the message should be delivered (as an email or as a push notification or as both), and what would happen when this step is complete?
- Step 2: Once the staff is notified, we are going to map out the process that staff has to follow to address the behaviour/performance concerns. In the next step, we will choose the option: Staff member has to complete a task, and detail the instructions that need to be followed for staff to meet with the student.
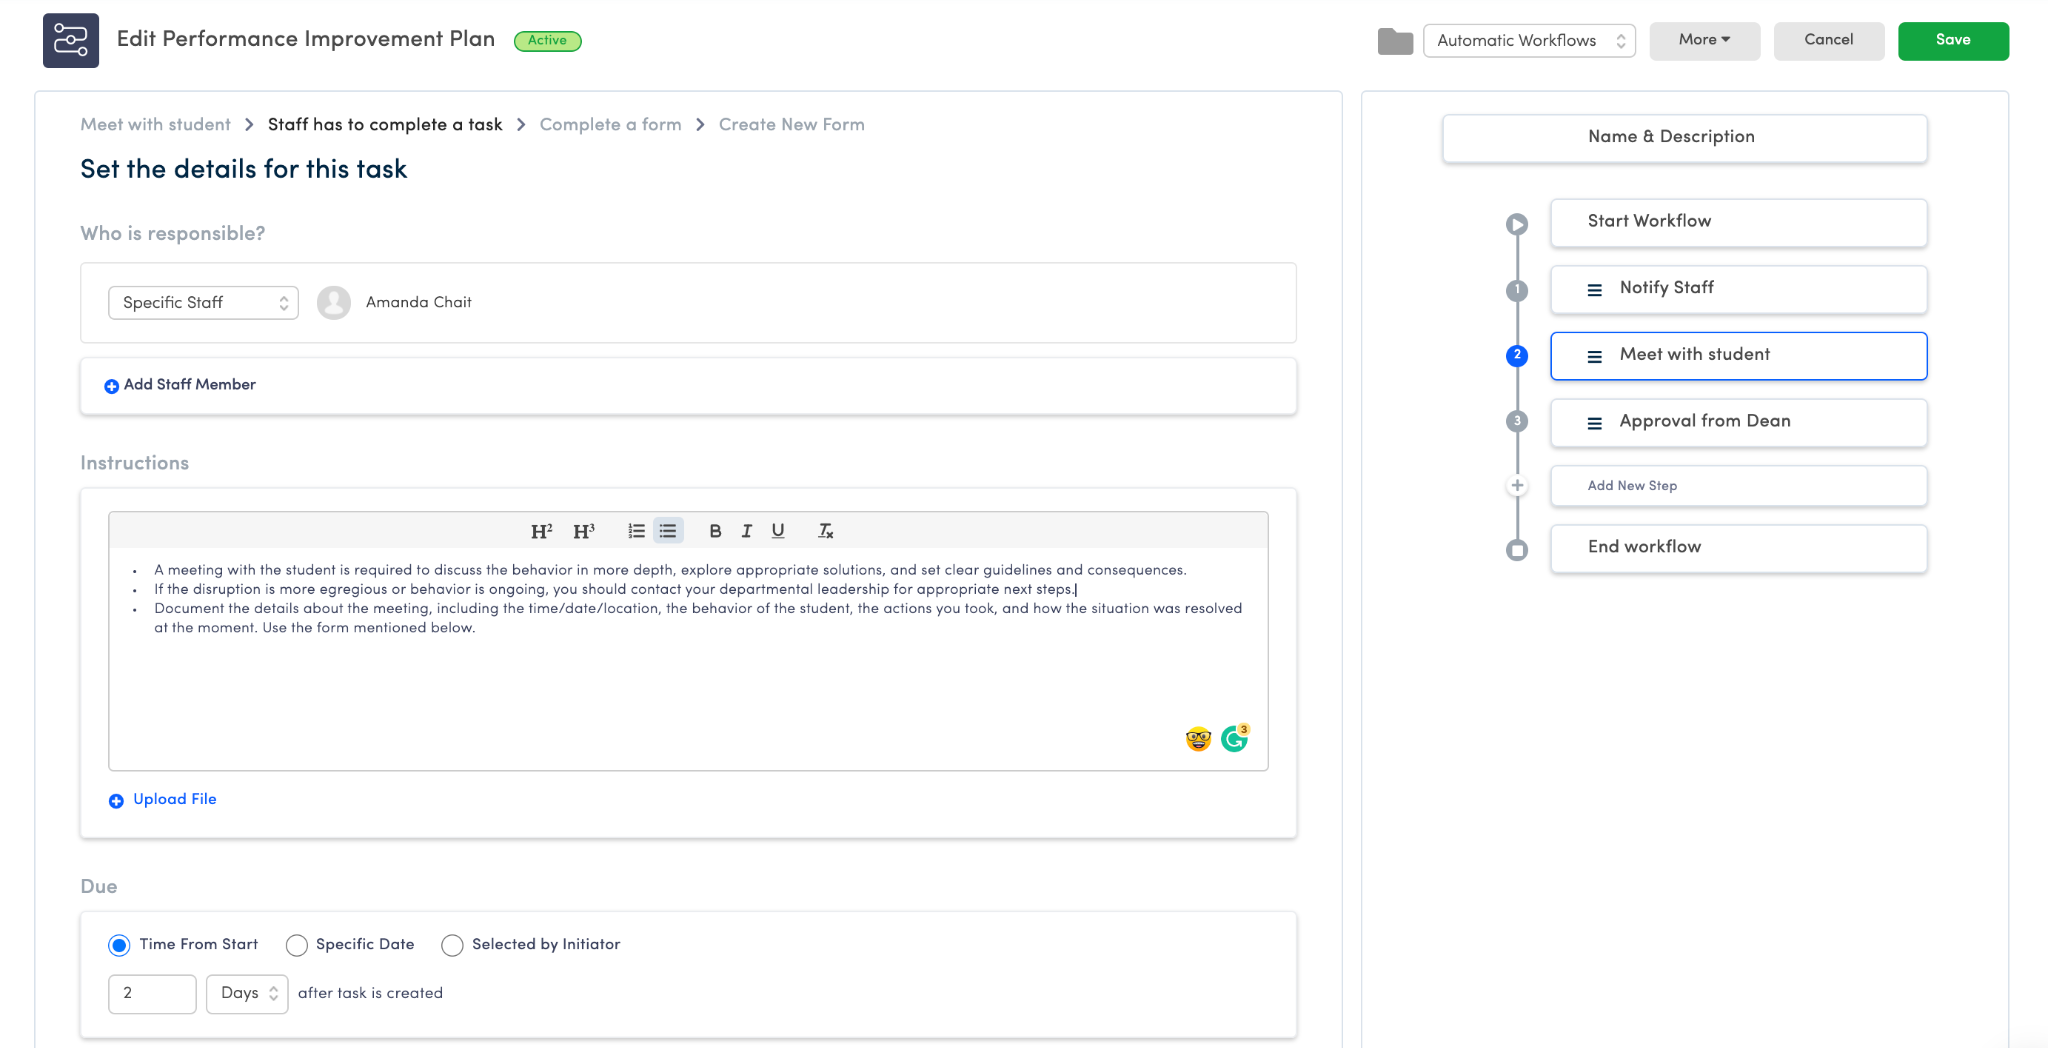
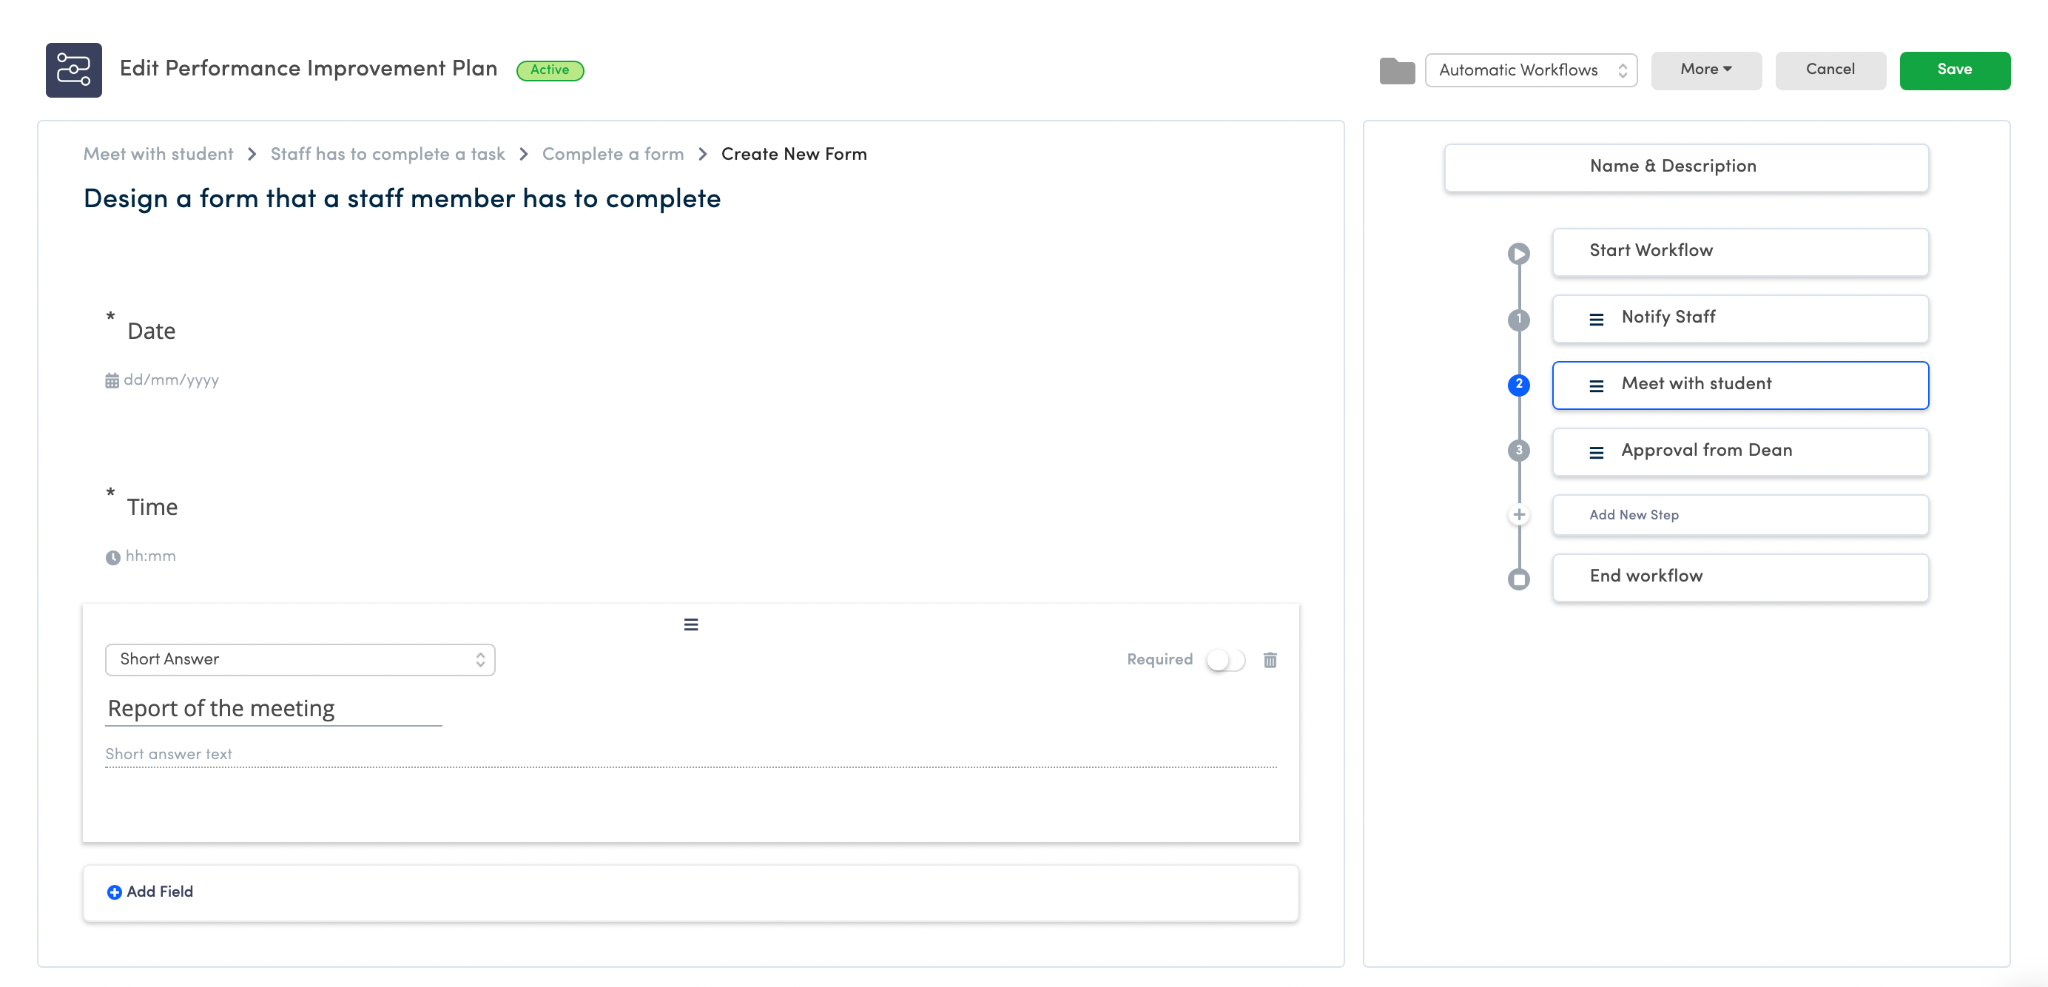
- Once the meeting is successfully completed, the staff has to document the details of the meeting via a form provided.
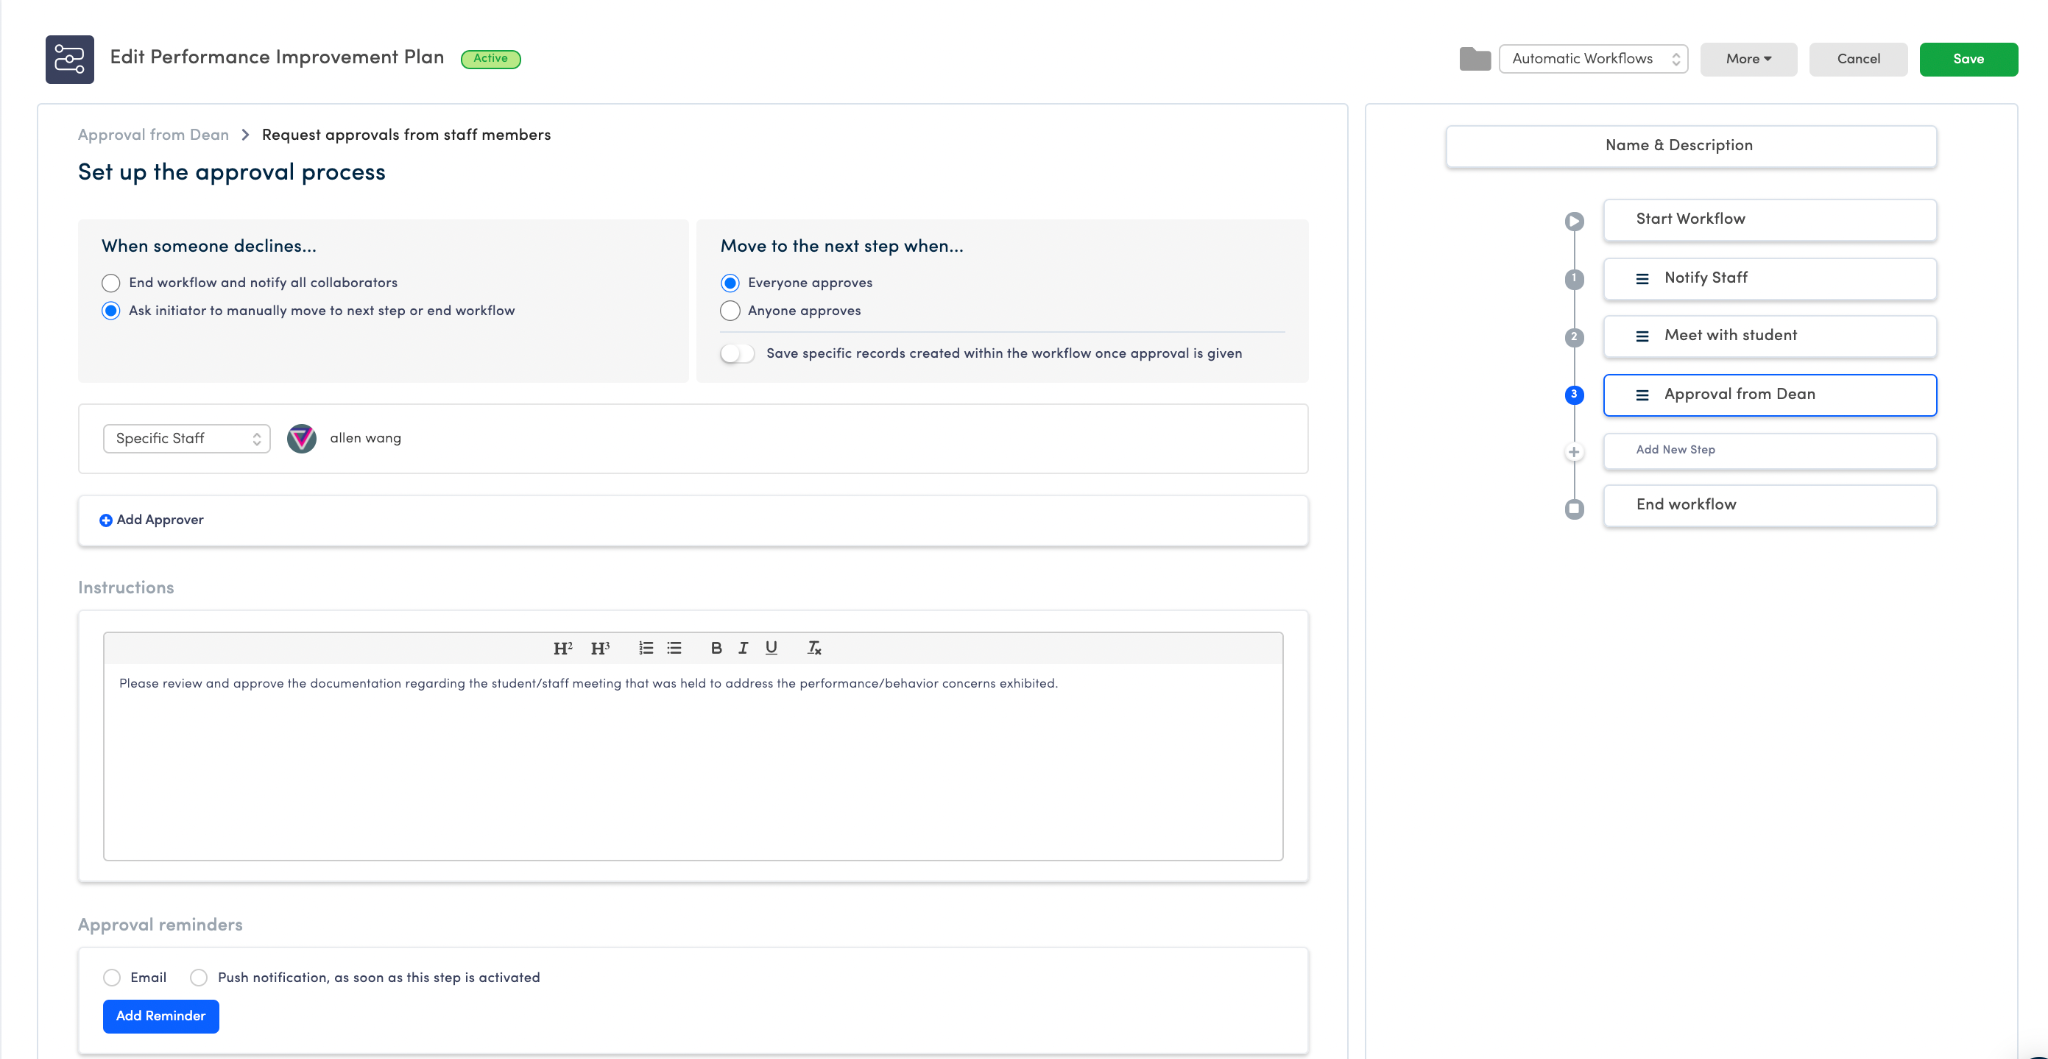
- Step 3: Next, it is sent to the Dean or Head of Department for approval. We are going to choose the option: Request approvals from staff members and map out the approval process.
- End Workflow: Once the workflow ends, it will be archived.
- When you've built the workflow and it is complete, the entire workflow will display on the right-hand side. You can click on the different steps to edit or re-order by dragging and dropping in the appropriate order.
Go to the Orah app today and try your hand at creating workflows for some of your processes. And if you have any questions, do not hesitate to reach out to us.
If you would like to book a demo to understand how Orah and its features an help you and your school, please write to me at kavyapriya@orah.com
Get Orah Passes, Attendance Insights & Alerts free for 30 days, plus an incredibly useful newsletter
Join thousands of school leaders exceeding their school's duty of care—subscribers receive free access to our attendance management tools, Orah Passes, Attendance Insights & Alerts for 30 days. When you sign up, we'll send you a guide detailing the setup process.


